As a professional dog photographer, there are a ton of things that I have learned that I never expected to be important. In this blog post, I'll talk about how you can capture some cute photos of your slobbery companion at home and some of the things that our furry friends have taught me!
Since my blog post about taking cute photos with your significant other was pretty successful, I thought that it would be a good idea to discuss how you can take some cute photos of your pup at home. First things first, your dog should always remain on a leash unless you are in a fenced in area. I'll even talk about how you can hide the leash in plain sight without the need for Photoshop.
Getting right into it, make sure that you have A TON of treats with you. This will help you get your dogs attention. You can also bring toys or sticks if your dog likes those. I also use peanut butter on their nose to create some adorable photos with their tongues out. If you are feeling bold, you can also bring a spray bottle as well!
Just like my last blog post about taking your own photos at home, I have a few suggestions to make your photos look good even when they are taken on a phone. First off, you can take a video instead of a photo. This will give you a bunch of options when picking the photo you like best. Simply screenshot the frame that you like. You can use portrait mode if you would like but be cautious when doing so. Portrait mode can blur areas of the photo that should not be blurry so be mindful of that.

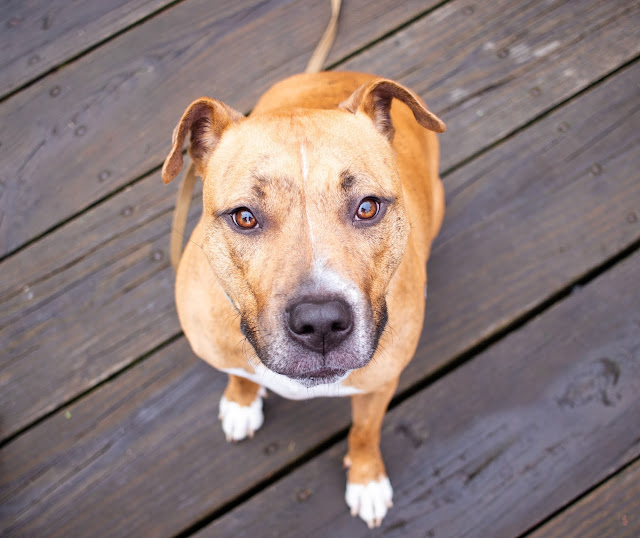
In the photo above, you can see a few concepts that I generally work with. One of my favorite poses that I like to do with dogs is having them sit and taking a photo from directly above them. This creates the loving look that dogs often do to people. To hid the leash in this photo, you have two options. Either run the leash down their back and out the back of the photo or pull it out in front of them. This will minimize how distracting it is. If it is just you working with the dog, you can put your ankle through the handle of the leash so you still have control of the dog.
As you can see in this photo, I put peanut butter on his nose. This can create some super cute photos of the dog's tongue being out. You can also put water in a spray bottle and use the mist setting for a similar effect.
Another option that you can consider is taking your dog on a scenic hike. They'll love the long walk and you can produce some super cute photos like the one above. The one works best if you have someone to help you hold the leash.
As for editing photos taken on an iPhone, you have a ton of options right in your photos. Let's discuss what some of the different categories mean and what they will do to your photo.
In this instance, we will be using portrait mode. To access the editing features, click on the photo, click edit and click on the second icon on the bottom of the screen. From here, you'll see auto, exposure, brilliance, highlights, shadows, contrast, brightness, black point, saturation, vibrance, warmth, tint, sharpness, definition, noise reduction and vignette. Now, let's discuss what each of these do! I will list them in the order that I edit in.
Auto: This wil automatically edit your photo. I would recommend that you stay away from this tool and manually do it.
Exposure: This should be the first thing that you edit. Make sure that you find a balance where all of the highlights and shadows somewhat good. This should create a happy medium for brightness. I generally adjust exposure based on the middle range of brightness and adjust the highlights and shadows later on.
Contrast: Contrast adjusts the difference between the dark and light areas of a photo. A high contrast can create drama while a low contrast can create subdued tones.
Highlights: Highlights adjust only the brightest parts of your photo. When adjusting highlights, make sure no bright areas are too blown out. This can create a haze across your photo.
Brightness: Brightness adjusts all of the bright parts of your photo except for the highlights. Use this to create a nice balance between the highlights and middle brightness of the photo.
Black Point: The black point sets the "darkness level" of the dark parts of the photo. This should balance out the shadows and the midtones.
Shadows: Shadows set the darkness of the darkest part of the photo. Ideally, you should have all of the dark areas not be completely black.
Brilliance: Brilliance brightens shadows and darkens highlights which helps make some details more clear. This is especially useful if you have a photo with highlights and shadows that are blown out.
Saturation: Saturation is a tool that I would try to stay away from or use sparingly. It intensifies the color of all of the pixels in a photo. If you use too much saturation, it can look like you used a filter on your photo which is not a look that you want.
Vibrance: Vibrance is a lot more important than saturation because it intensifies only the colors that are muted. This can create a photo with colors that pop but that do not look too edited.
Warmth: A positive warmth makes the photo have orange and red undertones while a negative warmth makes the photo have blue undertones. As a general rule when working with people, I like to add warmth to my photos.
Tint: Tint adjusts the magenta and green in a photo. A positive tint adds pink and a negative tint adds green. I would only use this tool sparingly on the positive side. There is not really a need to use it on the negative side since it can create photos with weird color combinations.
Sharpness: The sharpness tool increases details in photos. Make sure you do not use this tool too much because it can actually lower the quality of your photo and add grain.
Definition: Definition can add depth to your photos by adjusting the midtones of your photos.
Noise Reduction: Noise reduction is good for correcting photos taken in harsh lighting. It reduces grain by softening the photo.
Vignette: A negative vignette adds a white round border around the photo while a positive vignette adds a black round border around your photo. A black vignette can add drama to your photo.
So, I know that was A LOT of information. Want to see this information in action? Check out the before and after of the photo below. I'll also include my iPhone Photos edit settings as well.
Exposure: -29
Brilliance: 17
Highlights: -20
Shadows: -16
Contrast: 4
Brightness: -10
Black Point: 11
Saturation: 0
Vibrance: 24
Warmth: 13
Tint: 19
Sharpness: 20
Definition: 25
Noise Reduction: 0
Vignette: 0
I hope you liked this blog post. Be sure to take some doggie photos and tag me in them on Instagram so I can see your work! @kellysheaphoto


Comments
Post a Comment